Wednesday, October 30, 2013

Baked Eggplant Parmesan

My buddy Emily inspired me to make this one. I was visiting her at her house and she picked 2 eggplants out of her garden for me. Thank you Em!

I love Eggplant Parmesan but I find that when it is fried it soaks up the oil. So this is a way to cut back on fat and the mess of frying, too. Double dipping, I just love that. I actually like this version much better too. Mangia!


Baked Eggplant Parmesan
  • 1 or 2 eggplants
  • 2 eggs, beaten
  • ¼ cup milk, I used fat free
  • about 2 cups panko bread crumbs
  • 1 jar pasta sauce, I used Muir Glen Organic Roasted Garlic
  • Pam Olive oil spray
  • Sargento reduced fat grated, 4 cheese Italian
  • grated Parmesan cheese
Preheat oven to 375 degrees. Meanwhile slice eggplant into 1/2 inch thick slices. I had a small eggplant and a medium one that made 12 slices.

In 2 medium size bowls add the eggs and milk and mix well then add panko to the other bowl. Dip eggplant into egg mixture, then into panko pressing into panko on both sides. Place on a large baking sheet coated with olive oil spray. When all are coated spray the top of the eggplants with the oil too.

Place in oven and total bake time is 40 minutes but you will need to flip the eggplant after 20 minutes and spray the tops with oil, back to the oven it goes for 15 more minutes.

Meanwhile microwave about half of the jar of pasta sauce until it is hot. Remove eggplant from oven and add the hot pasta sauce on top, then the grated cheeses, cook for 5 more minutes or until cheese is melted and it's golden brown on top.

Easy clean up tip: Line baking sheet with foil before baking.

Wednesday, October 23, 2013

Baked Beef Stew

Baked Beef Stew for a crew. This recipe is so easy you just throw the ingredients into a roasting pan and bake. No need to brown the meat and it makes its own gravy. Now how cool is that! The meat is so tender and it is a nice hearty meal for a cold chilly day. Warm up your chilly bones from the inside out. Comfort food = Love.

Baked Beef Stew
  • 3 14.5 oz cans diced tomatoes in juice
  • 3 cups water
  • 1/2 cup plus 1 Tbsp. Minute Tapioca
  • 1 Tbsp. Worcestershire sauce
  • 1 Tbsp. salt
  • 1 Tbsp. sugar
  • 1 tsp. freshly grated black pepper
  • 1 tsp. granulated garlic powder
  • 3 bay leaves
  • 3 slices bread, crust removed and cut into cubes
  • 2 cups onion cut into chunks
  • 2 cups celery cut into chunks
  • 1 lb. bag of baby style carrots
  • 8 cups of potatoes cut into chunks, skin on or small baby potatoes w/ skin on
  • 4 1/2 lb. Beef Stew meat
  • cooking spray
Preheat oven to 375 degrees. Meanwhile add first 10 ingredients into a very large bowl and mix well, make sure you break up bread pieces it is important. Then add the rest of the ingredients. I cut the meat into smaller chunks if they are really large and trim off  any membrane if there is any, the size of the meat and potatoes is your preference.


Spray a large roasting pan (17 x 14 x 31/2 inches) with cooking spray. Place stew mixture into pan and cover with foil, bake on center rack for 2 1/2 to 3 hours or until meat is tender. Remove from oven and carefully remove foil, serve immediately. Enjoy!

This would be a perfect meal for the crew if you are on ski trip, hunting, cross country skiing, etc.  A great meal for a cold days activities if you want an easy to fix meal that will satisfy. This is a variation on a recipe that I found years ago in The Taste of Home magazine.

Wednesday, October 9, 2013

Manhattan Clam Chowder

There is nothing better on a cold fall day than a hot bowl of chowder to warm up your chilly bones from the inside out. This recipe is doubly delicious because not only do you get to eat these tender clams but you get your veggies too.

You may notice that I use soup base in my soups all of the time. I swear it makes the best tasting soups ever! I have to order mine online, but you can get the chicken and beef bases at the wholesale food clubs in the spice aisle.


Manhattan Clam Chowder

  • 10 cups water
  • 1 6 oz. can tomato paste
  • 1/3 cup clam base
  • 1 tsp. dried thyme
  • 1/2 tsp. celery seed
  • 1/2 tsp. freshly ground black pepper
  • 2 bay leaves
  • 1 16 oz. bag of frozen petite peas
  • 1 14 oz. bag of frozen lima beans
  • 1 16 oz. bag of frozen white corn
  • 1 16 oz. bag of frozen cut green beans
  • 3 stalks celery, finely diced
  • 1 1/2 cups carrots, chopped
  • 1 med sweet onion, finely diced
  • 2 cups potatoes, chopped into bite size pieces, I like to leave the skin on but it's your choice
  • 1 1/2 cups carrots,finely diced
  • 1 51 oz. can of Chopped Ocean Clams
In a large 8 qt. or larger soup pot add the first seven ingredients and bring to a boil, stir soup base and tomato paste to break up and mix evenly. 

Meanwhile, prepare remaining fresh veggies. After soup broth comes to a boil add veggies and bring to a boil again. Then lower heat to a simmer, cover and cook for 45 minutes.

Then drain juice from canned clams into soup pot but reserve the clams and set aside for now. Bring soup back up to a boil again then stir in the clams and cook for about 5 more minutes. I do this so as to not overcook the clams and make them tough.

Remove bay leaves and serve immediately. Enjoy!

Wednesday, September 25, 2013

Shepherd's Pie

When my Stud muffin and I got married, this was the only recipe that he had me ask my MIL for, Shepherd's Pie. She was surprised that this was the one that he wanted. Through the years I have altered it to make it lower in fat (98% fat free cream of mushroom), but you can do the original version if you so choose. It's nothing special to look at but it is very tasty. Seems to me you could turn it up a notch by sautéing 8 oz. mushrooms (sliced thin) and adding about 1 cup of frozen petite peas (thawed, of course) to meat mixture. Also, I must say that a yellow meat potato makes the best tasting mashed potato. It's a nice frugal but tasty casserole for the chilly days ahead. Leftovers microwave well. Enjoy!

Shepard's Pie

  • 1¼ lb. Ground Turkey 99% lean or Ground Beef
  • ½  cup diced onion
  • 1 can Cream of Mushroom Soup 98% fat free, undiluted or high test
  • 1 Tbsp. Worcestershire Sauce with turkey or if using beef use 3 Tbsp.
  • Mashed potatoes, already prepared
  • cooking spray
Preheat oven to 350 degrees. Meanwhile brown meat and onion in nonstick skillet sprayed with cooking oil. Cook until meat is cooked through and no longer pink, only drain fat if using beef and set aside.

In a large bowl whisk together soup and Worcestershire sauce and mix well. Stir in meat mixture, coating  evenly.

Spray a casserole dish with cooking spray and spread meat mixture evenly into casserole dish.

Then place a layer of mashed potatoes over top, about 1 inch thick. Bake uncovered for 30 minutes at 350 degrees.

Wednesday, September 4, 2013

Fiesta Chicken Casserole

I love spicy and this one will warm you up from the inside out. No spice wimps are allowed to try this one, i.e., no cry babies. This version is lower in fat, but big in taste. It's a double win when spice and low fat come together so deliciously. The cool fall days will soon be here for you to enjoy this one.

Fiesta Chicken Casserole 
  • About 4 cups leftover diced chicken
  • 1 4 oz. can diced green chiles
  • 1 16 oz. can black beans, drained & rinsed
  • 1 14.5 oz. can salsa style fire roasted diced tomatoes
  • 1/2 cup hot salsa
  • 1 Tbsp. Chili powder
  • 1 tsp. onion powder
  • 1 tsp. paprika
  • 1 tsp. garlic powder
  • 1 tsp. ground chipotle powder
  • 1/2 tsp. cumin
  • 8 flour tortillas, 6 inch size
  • cooking spray
Topping
  • 1 2.25 oz. can sliced black olives, drained
  • 1 jar sliced pickled jalapenos, only using desired amount
  • Sargento 4 cheese Mexican reduced fat cheese, 8 oz.
  • Utz baked Tostitos, 2 cups crushed
Preheat oven to 350 degrees. Spray a large nonstick skillet with cooking spray and add first 11 ingredients. Simmer over medium heat for about 5-10 minutes. Meanwhile spray a 9x13 inch Pyrex dish with cooking spray, then evenly cover bottom and side with tortillas, overlapping slightly.

After simmering the chicken mixture, spread evenly over tortillas. Top mixture in following order: crushed Tostitos, cheese, olives and jalapenos. Bake at 350 degrees for 35 minutes. Enjoy!

Wednesday, July 31, 2013

Italian Style Green Bean Salad

Easy to make, low calorie and low fat never tasted so good. A recipe will not get any easier then this one, but do not be fooled as it is tasty, too. Cool beans for a hot day. Enjoy!

Italian Style Green Bean Salad
  • Two 14.5 oz. cans green beans, drained
  • 4 slices red onion, sliced thin, then quartered
  • 1/4 cup light balsamic dressing, I used Ken's light options
  • 1/4 tsp. dried Oregano
  • 1/2 tsp. Garlic, chopped from jar
  • Freshly ground black pepper to taste
Drain green beans and place into a large mixing bowl. Add remaining ingredients and cover, chill for several hours or overnight.

Tuesday, July 23, 2013

Giant Basil

I'll tell you my secret to growing "Mutant Basil" and it is so simple. My Stud Muffin came up with the solo cup idea for support and it really makes a difference. How about that, another clever use for the Red Solo cup.

I love fresh basil on tomato and mozzarella salad, Tuscan Bean Salad, and of course in my spaghetti and pesto sauce just to name a few. I use fresh snippings all summer long, just remember to never take off more then 1/3 of the plant at a time. 

Right around the end of September my hubby picks off the leaves from the plants for me. Then I wash and dry the leaves well, at this time I will freeze the rest of the leaves for pasta sauce in the winter. Just load into a Ziploc freezer bag with the freshly washed leaves and pop into the freezer. This is my favorite trick as you will not need to chop the basil, it will crumble easily once it is froze. You may also make pesto and  freeze in ice cube trays and then load cubes into Ziploc freezer bags. Enjoy your summer's bounty all winter long.

How to grow Giant Basil plants
  • 1 live Basil plant, from grocery store produce section
  • Miracle Gro Moisture control potting mix
  • red solo cup, it has to be red (just kidding)
  • 1 large ceramic pot with drain holes
  • small stones
After the danger of frost when it is starting to warm up outside in spring is the best time to plant. I have found they do well planted directly into the ground as well if you don't want to use a planter. I live in Maryland so that is mid May to early June for me.

I like to line the bottom of the ceramic pot with about 1 inch of small stones. Then fill to the top with soil and press soil down with your hands to compact it. Dig out a small hole that is just deep enough to cover the soil mound and roots that are on the bottom of the basil plant.

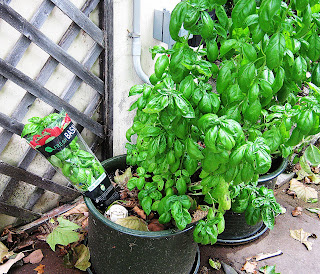
Remove basil from plastic bag and plant in soil and press firmly around the edges. Then cut down one side of the solo cup to the bottom and then cut the bottom completely off. Now open the cup up and warp it around the Basil plant and this will hold the plant up until if gets strong enough to stay up on its own.


How do you like my little happy face? When it is strong enough to stand tall by itself carefully remove the cup. Keep basil moist but not saturated. My plants do well in partial sun, beside my basement door right up against the house. The cup holds the plant up and lets is still spread out some.

Don't forget to pinch off flowers as you do not want the plant to go to seed. Also your Basil will grow better if you use it regular and if you do not just prune some off.