Tuesday, June 28, 2011

Red, Black & Blue Burgers

It's summer and it's grilling time. The 4th of July most certainly should be celebrated with a barbecue and of course burgers, center-stage. They are delicious and there are so many variations. So read on and check out my new version. It was a big hit at my house and it is sure to be at your home, too. We love the 4th of July because it is such a festive holiday and we love fireworks. My Stud Muffin has earned the nickname Pyro Pop for his love of lighting fireworks. I believe he has passed that gene on to our two sons as well. Let's celebrate of the Declaration of Independence.


Red, Black & Blue Burgers


  • 2.4 lbs. 90% lean ground beef
  • cooking spray
  • 5 oz. container of crumbled blue cheese
  • 3 ripe red tomatoes
  • 1 medium red onion sliced thin
  • Blackened Seasoning Mix
Evenly divide meat into 7 equal size balls. Then patty into a nice think burger. Place burgers on an oil coated platter covered with plastic wrap in the freezer for about 35-45 minutes. This will chill the burgers real well to make it easier to slice in half.

When chilled thoroughly remove from freezer. Place on cutting board and using a serrated bread knife gently and slowly saw burger in half, being careful not to break up burger. Then on one half of burger place a heaping 1 Tbsp. of crumbled blue cheese. Place other half on top and press edges together to seal and then patty together well with your hand. You may cover and refrigerate to cook later or immediately cook them on the grill. I like to prepare mine a few hours in advance.


Just before you grill burgers gently shake the blackened seasoning on both sides of the burgers, lightly covering. We cook ours on a gas grill on high for 14 minutes, 7 minutes on each side, only turning once. I also like to coat the hamburger buns on the inside with olive oil and grill oiled side down for the last 1-2 minutes the burgers are cooking.


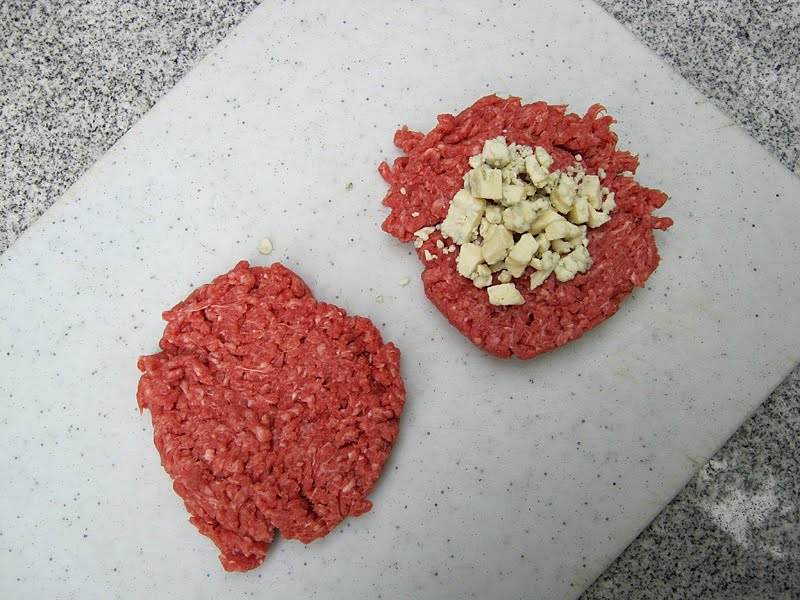
This will make 7 big burgers and if you are a wimpy crybaby about spice don't put it on yours. It really is not hot, just a nice flavor. No crybabies allowed. Serve this up on the buns with a slice of red onion and tomato. Enjoy!!!

Monday, June 20, 2011

Macaroni Salad

There are so many variations on this and everyone has a favorite version and I want to share one of my favorites with you. This is one that you must prepare 24 hours in advance to let the flavors meld. I like the crunch of the carrot and crispness of the pepper, together with the creaminess of the elbow macaroni. I always thought elbow was an odd name for a pasta. I look at it and it does not make me think of an elbow. Food for thought. Enjoy!

Macaroni Salad
  • 1 (14.5 oz.) box Ronzoni Smart Taste elbow macaroni
  • 1 cup finely diced green bell pepper or sweet banana pepper
  • 1 cup finely diced carrots
  • 2 tsp. salt
  • 1 tsp. celery seed
  • 1 tsp. freshly ground black pepper
  • 2 ½ cups Hellman's light mayonnaise
Cook macaroni according to package directions, but extend cooking time to 12 minutes. Meanwhile prepare carrots and pepper. Drain macaroni into colander when macaroni is cooked and rinse with cold water to cool down macaroni, drain well. In a very large bowl mix together macaroni and remaining ingredients. Place in an airtight container and chill overnight to serve the next day. Enjoy!

Tuesday, June 14, 2011

Red Beans & Rice

Red Beans & Rice is a versatile dish. I sometimes eat them as a side with my Blackened Fish Tacos, as a bowl of beans for lunch, or even as a Burrito. Either way you can't go wrong, and the flavor of this dish is perfect. My goodness I thought our good friend Jim was going to lick the bowl clean after he was done. He's spent most of his life in California and he gets really good Hispanic food there. So it was a very nice compliment when he raved about my beans & rice. Preparation is so easy too. Enjoy!

Red Beans & Rice


  • 1 cup long grain brown rice
  • 3 (15 oz.) cans Goya, Red Beans in Sauce
  • 1 (7 oz.) can Goya, Chipotle Peppers in Adobo Sauce
Cook rice according to package directions. About 5 minutes before rice is fully cooked, in a large pot add red beans and one or two diced chipotle peppers, because they tend to vary in size. Bring to a simmer, when rice is fully cooked add to beans and mix together well. Simmer for 5 minutes. Serve immediately. Enjoy!

You will have leftover chipotles. I like to freeze them individually in small ziploc snack bags for later use. I pull then out one at a time as I need them for recipes. The brown rice is healthier than the white rice and it goes well in this recipe. This is so simple and it has the best flavor. You will find Goya products in the ethnic isle.


If you have leftover beans and rice it will make a delicious burrito, all you need is a tortilla and some cheese. It's really good to eat cold too.

Monday, June 6, 2011

Chocolate Chipotle Frito Drops

This is a fun invention that is really different. The sweetness of the chocolate and the saltiness of the Frito go very well with the spice of the chipotle. I like the delayed reaction of how the heat of the chipolte sneaks up on you after you are munching on them. Surprise! It is a flavor bang that is well worth the try. Be brave, go for it.
  • 1 cup Ghirardelli double chocolate bittersweet chips, in bag
  • 1 Tbsp. Crisco
  • 1 tsp. ground chipotle chile
  • 1 bag Frito's scoops, 9 ¼ oz.
  • 1 small ziploc snack size bag

In a double boiler over low heat melt chocolate and Crisco. When chocolate chips and Crisco are melted well with a wire whisk stir in 1 tsp. chipotle chile powder and turn off heat. Place Frito's scoops on a large plate, scoop side up, so you can drizzle chocolate mixture into the scoops. Place melted chocolate into ziploc bag, close seal and snip a small corner off of end of bag. Squeeze drop a small amount into each scoop. Chill scoops in refrigerator for about 20 minutes, or until chocolate is completely set. Then you may store them in a airtight container in refrigerator.