Tuesday, December 20, 2011

Steamed Shrimp

Steamed Shrimp are my favorite and I always like to serve them over the Holidays. I really can not tell you why my family has always called them Steamed Shrimp because they are really boiled shrimp, cooked in beer and Old Bay. The simplicity of only 3 ingredients will makes you realize that less is more. I always remember that they were only served on special occasions and they were always a special treat. Of course when you make these you need to take 5 minutes to make my homemade cocktail sauce as well. Only the best for my guests. Every time I make these I get rave reviews. So if you want an easy to fix meal that will be sure to say I love you, then you must try these treasures. Merry Christmas!


Steamed Shrimp


  • 2 - 2 ½ lb. shrimp, either 26-30 count (large) or 16-20 count (extra large)
  • 2 12 oz. bottles of beer
  • ¼ cup Old Bay Seasoning, with a little extra for sprinkling
In a large dutch oven pot bring to a boil Old Bay and beer. When it has reached a full boil add shrimp. Once the shrimp come to a full boil again stir well, then cover lowering heat so that it will boil while covered and cook for 5-7 minutes stirring occasionally. *** Time saving version if you do not have time to thaw out your shrimp in advance. Bring beer and Old Bay to a boil, add frozen shrimp (maximum amount to cook at one time is 2 1/2 lbs), bring back to a boil. Then lower heat to a simmer and cover with lid. Start timing cook time from when frozen shrimp first came to a boil , for 5 -7 minutes.

Drain shrimp in colander or if you want to cook more shrimp remove them with a slotted spoon, reusing beer and repeating cooking directions. Only cook 2 ½ lbs at a time. With a slotted spoon transfer shrimp to a large bowl, sprinkle Old Bay on top of shrimp as you layer in bowl. You may serve these immediately or chill overnight and serve cold the next day. Serve with Cocktail sauce.


I prefer to buy wild caught shrimp over farm raised. I believe the taste is better. If fresh is not available frozen is fine. Just thaw out the night before in your refrigerator. Take advantage of sales on frozen or previously frozen shrimp (just ask for shrimp that have not been thawed out yet). I scan the newspaper and stock my freezer up when I see a bargain. Enjoy!


Cocktail Sauce


  • 1 cup ketchup
  • ¼ tsp. mustard powder
  • ¼ cup grated horseradish in jar
  • 1 Tbsp. fresh lemon juice
Mix together above ingredients well. You may make this a few hours in advance. Always use fresh lemon juice. this blows away expensive store bought cocktail sauce. I like my cocktail sauce spicy, if you do not, use less horseradish.

Wednesday, December 14, 2011

Praline Pull-Apart Bread

When I was a little girl, my Mom always made us sweet buns. The aroma of them baking in the oven was pure torture. She always added raisins and pecans to hers and we called them Sticky Buns, and sticky they were. Another friend said that his Mom always made this and they called it Rock Pile Cake. It does not matter what you name it, because your sweet buns by any other name will always taste as sweet. This is a make-ahead bread, and I just love that. Anytime I can prepare something this great in advance it makes my day. I see Praline Pull-Apart bread in your future.


Praline Pull-Apart Bread

  • 1 cup sugar
  • 4 tsp. cinnamon divided
  • 1 (2 lb.) pkg. Rhodes white frozen dinner roll dough or 2 (24 oz.) pkgs frozen parkerhouse style rolls only using 1 ½ of the pkgs.
  • ½ cup melted butter
  • 1 cup chopped pecans
  • ¾ cup whipping cream
  • ¾ cup brown sugar
Stir together sugar and 3 tsp of cinnamon. Coat each roll in butter; dredge rolls in sugar and cinnamon mixture. Arrange in a lightly greased 10 inch tube pan; sprinkle top with pecans. Cover and chill in refrigerator for 8-18 hours.

The next morning preheat oven to 325 degrees. The next step of whipping the cream is very important, it's the secret to the smooth texture of the caramel flavored sauce. Beat whipping cream at high speed with an electric mixer until soft peaks form; stir in brown sugar and remaining 1 tsp of cinnamon. Pour mixture over dough. Place pan on top of aluminum foil lined baking sheet.


Bake at 325 degrees for 1 hour or until golden brown. Cool on a wire rack for 10 minutes; invert onto a serving plate, and drizzle with any remaining glaze in pan.


This recipe was published in Southern Living magazine a few years ago.


Thursday, December 8, 2011

Easy Chocolate Truffles

Decadent Chocolate Truffles will spoil your family and friends over the holidays. This is a much simpler and easier version than most truffle recipes. It is a little time consuming rolling the little balls, but oh so worth it. Divide these up and pass around for a nice homemade gift. You will need to keep them refrigerated and they are best consumed within 3-4 days. What is really nice is that you can make these in advance and freeze for up to one month. I found this recipe years ago in The Taste of Home magazine.

Easy Chocolate Truffles

  • 3 cups (18 oz.) Ghiraradelli bittersweet chocolate chips 60% cocoa
  • 1 can (14 oz.) sweetened condensed milk
  • 1 Tbsp. vanilla extract
  • toppings; chopped flaked coconut, finely chopped nuts, cocoa or sprinkles

In a double boiler over low heat melt chocolate. Stir in vanilla and milk, whisk together with a wire whisk until smooth. Chill for about 2 hours or until mixture is easy to handle. Shape into 1 inch balls. Roll in coconut, sprinkles, cocoa or ground nuts.

I like to whirl the coconut in my food processor so the flakes are not too large.


Wednesday, November 16, 2011

Baked Penne Pasta

Pasta. What's not to love? This is the perfect way to enjoy a nice warm dinner on a cold day. Give you and your family that special treat that is well deserved. My hubby and I love this dish. It's a little work preparing, but once it's in the oven your work is done. This is a dish made healthier, but still tasty. So, you can have your pasta and eat it too.

I notice that a lot of kids have do not like large chunks of tomato in the sauce. Make sure you use petite diced tomato, it makes a big difference.


Baked Penne Pasta


  • 1 (14.5 oz.) box of penne pasta (Ronzoni Smart Taste)
  • 1 Tbsp. olive oil
  • 1 onion, diced
  • ¾ tsp. garlic powder
  • 1 pkg. ground turkey 99% lean (about 1 1/3 lb.)
  • 1 Tbsp. dried oregano
  • 1 (14.5 oz) can petite diced tomato
  • 1 (15 oz.) can tomato sauce
  • ½ cup chicken broth
  • ½ cup fat free milk
  • ¼ tsp. freshly ground black pepper
  • 8 oz. reduced fat Sargento's grated 4 cheese Italian
  • 1 cup grated parmesan cheese
  • 1 cup grated Asiago cheese
Cook pasta according to package directions. Meanwhile cook turkey and onion in a large nonstick skillet until meat is brown and is no longer pink. Drain fat out of skillet.

Then add to turkey: onion, tomatoes, tomato sauce, oregano, garlic powder, and olive oil. Bring to a boil, then cover and reduce heat to a simmer for 15 minutes. Then stir in stock, milk, and penne pasta, mix well. You may season with black pepper. Place half in a large 10 x 13 inch pyrex dish sprayed with pam spray. Cover with half of the parmesan and 4 cheese blend, then repeat. Spread Asiago on top of pasta last. Bake uncovered for 35 minutes at 350 degrees. Enjoy!


This is a healthier version and you will not miss the fat and the high fiber pasta is delicious. Makes 8 generous portions.

Wednesday, November 9, 2011

Eggplant Fans

I love eggplant, and this is another way to try it. You will see that you don't have to be Italian to love eggplant. You may serve this as a side, or stuff it into a pita bread or Italian roll for a sandwich, add some cheese if you wish. This is so yummy and an added bonus, it is a healthy dish too. Oh, and yes, your house will smell delicious while this is baking. Buon appetito!

Eggplant Fans

  • 1 large eggplant
  • 1 large sweet onion, peeled and sliced thin
  • 3 Roma or plum tomatoes, sliced thin
  • 1 12 oz. jar marniated artichoke hearts in oil, drained
  • 1 can whole black olives, only using ½ cup drained
  • 2 bay leaves, broken into small pieces
  • ½ tsp. oregano
  • ½ tsp. thyme
  • 4 cloves garlic crushed in garlic press, or ½ tsp. garlic powder
  • Extra virgin olive oil
  • 1 large glass pyrex dish
  • foil

Preheat oven to 450 degrees. Wash eggplant and slice in half length wise, then slice into fans, but not cutting all the way through to the top. Drizzle about 2 Tbsp. olive oil on bottom of pyrex dish. Add about half of the onion, then season with half of the oregano, thyme and garlic. Place eggplant fans on top of onion mixture, then stuff between fans: tomato slices, artichoke hearts and olives. Scatter about broken pieces of bay leaves around and top with the rest of the onion. Then season with the rest with oregano, garlic and thyme. Drizzle about 2 more Tbsp. of olive oil over top. Cover with foil and bake for 10 minutes at 450 degrees, then lower heat to 350 degrees and bake for 1 hour 20 minutes.


This is a slight variation of one of my favorites, the original is from my Time/Life cookbook for vegetables.


Wednesday, November 2, 2011

Pumpkin Pancakes

Fall is here and so are all of the goodies that come with it. Add this one to your list, Fluffy Pumpkin Pancakes. They will melt in your mouth. The pancakes are so light and fluffy and they absorb the syrup, so you may need a second splash of that. Oh, the aroma of the pancakes cooking will have your family come running to the table. It's a great warm you up breakfast to stop the rumbling in your tummy.

Pumpkin Pancakes


  • 2 cups cake flour
  • 2 Tbsp. baking powder
  • 4 Tbsp. light brown sugar
  • 1 ½ tsp. cinnamon
  • ½ tsp. allspice
  • ½ tsp. salt
  • 2 eggs, beaten
  • ¾ cup milk
  • ½ cup pumpkin
  • ¼ cup canola oil
  • 1 tsp vanilla extract
  • Pam cooking oil spray
Preheat large nonstick pan over medium heat. In a large bowl mix together the first six ingredients and set aside. In a medium size bowl mix together the next five ingredients, mixing well and make sure pumpkin is dispersed throughout. Then add it to the dry ingredients and stir until just mixed. In a large. nonstick, oil-coated pan add ¼ cup of batter at a time. Flip when edges start to look dry and it is just starting to brown. Cook until golden brown and serve immediately with butter and maple syrup. Makes 16 pancakes.

Thursday, October 27, 2011

Browned Mozzarella Sticks

I have my son Matt to thank for this creation (Thanks, Matt!). He calls it poor man's Halloumi. He discovered that you could brown this certain brand of string cheese (Kroger's CowPals Light), and I experimented and found two more brands that work as well (Weight Watchers and Cheeseheads Light). Other brands I tried melted and did not brown. This is the quickest and easiest appetizer that you could ever make. It is so good, and I know you will not be able to eat just one. I could hardly wait until I was done taking the pics so that I could eat it. Here we go for a party or a football game, you name it. Be the first one to show your friends and family this amazing treasure. It's like fried mozzarella sticks without the breading and oil. It's simply good. Enjoy!


Browned Mozzarella Sticks

  • 1 pkg. light Mozzarella string cheese sticks individuallly wrapped*
  • Spaghetti sauce for dipping
You will need to heat up a nonstick skillet over medium heat, do not coat with oil. Unwrap cheese sticks and place in skillet, as cheese begins to brown in about 2-3 minutes start to turn with tongs to brown all sides. CowPals holds its shape better than Weight Watchers, but Weight Watcher cheese browns well too. Serve immediately with some spaghetti sauce for dipping. Eat before cheese cools down and becomes a little tough.


*The best brands to use are Frigo Cheese Heads light string cheese, Kroger CowPals or Weight Watchers. The Frigo and Kroger brand work the best. I tried this with a lot of different brands and so far these are the only three that brown and do not melt.

Thursday, October 20, 2011

Hot and Crunchy Chicken

I used to eat this chicken dish at a restaurant in Frederick called Jennifer's, they have since closed. My hubby and I were fairly regular diners there. We had many date nights there through the years. The Hot & Crunchy chicken was one of our favorites. Jennifer did not give me the recipe for it, but this is my version. I added more spice and crunch to it, by using Cayenne pepper and Panko bread crumbs. It is not over the top spicy because the sweetness of the honey mellows out the cayenne. I don't know what it is, but I love the combo of spicy and sweet together. So take the time to make this awesome chicken dish. I always get great feedback on this one.

Hot & Crunchy Chicken

  • 4 boneless skinless chicken breast halves, 4 to 6 oz. each
  • 2 cups Panko bread crumbs
  • 1 tsp. plus ¼ tsp. cayenne pepper
  • 1 egg, beaten
  • ⅛ cup milk
  • ⅓ cup canola oil
  • ½ cup chopped pecans
  • ⅓ cup honey
  • cooking spray
Trim all fat and cartilage from chicken and place inside a Ziploc bag. Place on top of cutting board and with a meat mallet, hammer breasts to about ¼ inch thickness. Set aside.

Place bread crumbs on a large flat plate. Then beat egg and milk in a small bowl. Rub ⅛ tsp. of cayenne pepper evenly on one side of chicken breast then flip over and do the same on the other side until all chicken breasts are coated with cayenne. Dredge chicken into egg, then press into bread crumbs.

Heat up a large 14 inch and a small 8 inch nonstick skillet over medium heat. Add oil to large skillet and spray small skillet with cooking spray. Add pecans to small skillet stirring occasionally for about 4 minutes to toast pecans. Add honey and ¼ tsp. cayenne pepper to toasted pecans, mix well. Turn off heat to pecans and set aside.

As soon as oil is hot in large skillet add chicken breasts one at a time. Cover with a splatter screen and cook for about 3-5 minutes on each side, or until no longer pink in center.


When chicken is ready, remove from skillet and drain on paper towels. Then place chicken on plate and evenly divide honey pecan mixture over top of breasts. This sounds like a lot of cayenne but it really is not too spicy. Try serving this with Baby Red Mashed Potatoes withPearl Onions and a green vegetable. Serves 4. Enjoy!

Friday, October 14, 2011

White Chocolate Spiced Wafers & Spiced Ice Cream Sandwiches

It's fall and the leaves are changing here in Maryland. It is just beautiful to take a ride and see all of the pretty colors. It hasn't peaked yet, so if you have time take a ride to Maryland it will be well worth your time. With fall I always think of spicy sweets, savory soups, and the the wonderful aroma that fills your house as you make them. It's funny how the season's affect your food cravings. Fall inspired me to try these really quick and easy sweet treats. They are only half way homemade, trick or treat. Sweets for the goblins, enjoy!

White Chocolate Spiced Wafers

  • 1 16 oz. box Sweetzel's spiced wafers
  • 1 cup Ghirardelli classic white baking chips, 11 oz. bag
  • 2 Tbsp. Crisco
  • candy corn, optional
Place cookies in freezer while preparing chocolate. In a double boiler over medium low heat melt chocolate and Crisco. Wisk together well and make sure that there is not any unmelted chocolate pieces. Place melted chocolate in a small ziploc sandwich or snack size bag. Then push out as much air as possible and seal it closed. With kitchen scissors snip a small piece off of one corner of the bag. Line up cookies on top of a cookie sheet, then squeeze on top of each cookie a circle of melted chocolate and immediately place a piece of candy corn on top. When all are decorated place in refigerator for about 15 minutes or until chocolate has hardened.


Spiced Ice Cream Sandwiches

  • 1 container of vanilla ice cream
  • 1 box of Sweetzel's spiced wafers.
Remove ice cream from freezer and let set on counter for about 5 minutes or until ice cream is soft enough to spread. With a flat sandwich spreader knife evenly coat one cookie with ice cream about ½ inch thick, then top with another cookie and press together. Spread knife around edges to smooth ice cream. Wrap them individually with plastic wrap and freeze immediately. Freeze overnight or for several hours.

Thanks to Lucky IraqDog, for helping to promote my cookbook, by giving a copy away to his 4,000th facebook fan. Happy Barkday, Lucky!

Thursday, October 6, 2011

Pumpkin Muffins

I tell you that nothing tastes better on a crisp fall day than warm pumpkin muffins. Oh, and the aroma that fills your house while they bake will make your mouth water. This is a quick and easy recipe that is sure to please. And when you tell your family or guests that they are homemade they will be impressed. Muffins for my Stud Muffin!

Pumpkin Muffins


Muffin topping:
  • 1/3 cup packed brown sugar
  • ½ tsp. cinnamon
  • 7 Tbsp. cold unsalted butter, diced into tiny cubes
  • ½ cup all purpose flour
In a food processor place above ingredients and whirl until crumbles just start to form. Cover and place in refrigerator.

Pumpkin batter:
  • 1 (15 oz.) can pumpkin
  • 1 cup canola oil
  • 4 eggs, beaten
  • 2/3 cup water
  • 3 cups sugar
  • 3 1/2 cups all purpose flour
  • 2 tsp. baking soda
  • 1 ½ tsp. salt
  • 2 tsp. nutmeg
  • 3 tsp. cinnamon
Preheat oven to 350 degrees. In large bowl mix the pumpkin, oil, eggs, water, and sugar. Sift the rest of the ingredients together and slowly add to pumpkin mixture. You may mix this by hand or use an electric mixer. Mix well.

Line muffin tins with cupcake paper cups and add 1/3 cup batter to each cup. Remove butter mixture from refrigerator and add a heaping 1 Tbsp. on top of batter. Bake for 30 minutes or until a toothpick into center comes out clean. This makes 32 muffins.

Thursday, September 29, 2011

Tuscan Bean Soup

There is not much that I like about the bitter cold Winter, but a nice bowl of homemade soup sure does help with the Winter doldrums. So since we do not have the option to hibernate we can rejoice in our home made soup.This recipe is so quick and easy you will never want to eat that awful canned soup again. Who wants flavorless salty canned soup? Repeat after me.....Homemade soup rules! Say it like you mean it.....with conviction! Smile.  This is a nice soup that will warm up your chilly bones from the inside out. Italian Style Bean Soup .

Tuscan Bean Soup


  • 20 oz Shady Brook Farms Sweet Italian turkey sausage
  • 1 cup diced sweet onion
  • 2 15 oz cans cannellini beans, drained
  • 1 14.5 oz can petite diced tomatoes
  • 2 Tbsp chicken base mixed into 4 cups hot water
  • ½ tsp. thyme
  • ½ tsp. salt
  • ½ tsp. garlic
  • ½ tsp. fennel seed
  • ¼ tsp. freshly ground black pepper
  • ¼ tsp. cayenne pepper 
  • 1 bay leaf
  • about 5 oz. fresh baby spinach leaves, stems removed
Sear the sausage links outside on the grill or in a 12 inch nonstick skillet over medium heat.  Meanwhile in a large soup pot add the next 11 ingredients, reserving the spinach for later and simmer while preparing sausage. As soon as the sausage is cooked and cool enough to handle cut into bite sized pieces, add sausage to soup pot and simmer for about 45 minutes. Then stir in the fresh spinach and cook for 15 minutes longer. Serve immediately with some hearty bread.

I prefer to use chicken base and water to flavor my soups. It is a paste that comes in a jar and you may purchase it in the wholesale food clubs (in the spice aisle). Also you can find it in restaurant food supply stores or online. If you don't want to use base you may use chicken broth instead. Also you may remove casing from sausage and cook it loosely instead of in links, it tastes the same ether way.

Thursday, September 22, 2011

Baked Stuffed Bread

This recipe gives a new meaning to bread. You will need a plate and a fork to eat this one. Be creative and change around the stuffing. In the past I have used olives, artichoke hearts and sweet red pepper. Use whatever rings your bell. Asiago cheese goes well with this instead of Fontina. Oh, my, and of course Raclette cheese would be fabulous as well. This would be great served with soup, salad or a bread with dinner. I'll bet you can't eat just one slice.

Baked Stuffed Bread

  • 1 loaf of a hearty bread of your choice
  • 8 oz. sliced mushrooms
  • 1 sweet yellow bell pepper, diced
  • 1 sweet medium size sweet onion or about ½ of a large one, diced
  • 8 oz. Fontina cheese
  • Pam olive oil spray
  • foil

Preheat oven to 350 degrees. In a large nonstick skillet over medium heat spray skillet with oil. Sauté mushrooms, onion and pepper until tender. Meanwhile slice a wedge shape top off of the bread and save for a lid for top of stuffed bread. Remove excess bread inside leaving a hollow shell and set aside. Slice cheese and layer onto the bottom of the bread shell saving just enough cheese to cover the top of the mushroom mixture. When mushroom mixture is sauteed spoon onto top of cheese in bread hollow. Then top mushroom mixture with remaining cheese slices. Top off bread with wedge shape lid that you saved. Wrap in foil and bake for 30 minutes. Let sit for 5 minutes before slicing.


Thursday, September 15, 2011

Shrimp Kabobs

It's hard to believe that summer is almost over and fall is just peeking around the corner. So enjoy this recipe while you still can. It is a good bit of prep in advance, but it is perfect dish to dazzle your company with. All of the prep work can be done before they arrive and you can relax and enjoy time with your guests. Cooking time is quick and easy too.


Shrimp Kabobs


  • 2 lbs. 15/20 count shrimp, peeled and deveined
  • zucchini, cut into chunks
  • yellow squash, cut into chunks
  • crimini mushrooms, marinated
  • sweet onion, cut into chunks
  • yellow bell pepper, cut into chunks
  • vinaigrette salad dressing of your choice
  • blackened seasoning

The day before, or at least 4 hours prior to cooking, marinate mushrooms in salad dressing. You will need Kabob skewers and a grill for this recipe. I skewered all of my mushrooms, shrimp, and veggies separately. Notice in the pic that I skewered shrimp using two sets of skewers. Generously sprinkle blackened seasoning over shrimp, veggie and mushroom kabobs. On a preheated grill set on high, cook veggies and mushrooms for 15-20 minutes and only cooking shrimp for about 7-10 minutes.

Thursday, September 8, 2011

Italian Cream Cake

Whoa! Boy does this cake bring back old family memories. My Mom baked this cake more times than I would dare to count. My Mom loved to bake and there was always lots of homemade goodies to chose from. RIP Mom and I'll bet you have your own designated kitchen in Heaven. This recipe is a little more work than most, but oh so worth it. You will be surprised how heavy this cake is when you pick it up, but oh so scrumptious in your mouth. This cake speaks for itself. Coconut and pecans are in this cake and in the creamed cheese icing as well. It will satisfy your sweet tooth and make your fat cells sing with delight!
Italian Cream Cake
  • 2 sticks unsalted butter (softened)
  • 2 cups sugar
  • 5 eggs, separated
  • 1 cup buttermilk*
  • 1 tsp. baking soda
  • 2 cups flour
  • 1 tsp. vanilla
  • 1 cup pecan pieces
  • 1 ⅓ cup coconut
Preheat oven to 325 °. Cream butter and sugar together. Add egg yolks 1 at a time, beating together with electric mixer after each addition. Mix together buttermilk and baking soda. Add mixture alternately with flour. Beat well then set aside.

Whip egg whites until stiff peaks form. Gently fold ⅓ of egg whites into batter, then add the rest of the beaten egg whites, vanilla, coconut and nuts, mixing well.

Bake at 350° for 30- 40 minutes or until a toothpick inserted into center comes out clean. Makes 2 (8 inch) cake pans. Cool in pan for 15 minutes then invert on wire racks to cool.

Italian Cream Cake Frosting

  • 1 stick unsalted butter (softened)
  • 1 8oz. pkg. cream cheese
  • 1 1lb. box powdered sugar
  • 1 tsp. vanilla
  • 1 cup pecan pieces
  • 1 cup coconut
Whip butter, sugar, and cream cheese on low until blended, then turn mixer up to high and add vanilla. Blend ingredients together until smooth and slightly fluffy (about 5 minutes). Fold in nuts and coconut. Frost cooled cake.

Egg white tip: Bowl and whisk should be clean with no oil residue. Room temp whites whip easier. When separating eggs from yolks be careful not to get any egg yolk into whites. Keep the mixer moving until they are uniformly white and form stiff peaks.

*To make your own buttermilk substitute: to one cup of milk add 1 Tbsp. of white vinegar. Stir and set aside for 10 minutes.

Thursday, August 25, 2011

Awesome Baby Back Ribs


Preparation tip: remove the thin membrane from the bottom of the ribs. I start at the narrower end to get it started and then it should pull right off.


Coat both sides of ribs with
blackened seasoning as a dry rub. Then wrap in aluminum foil and refrigerate for 24 to 48 hours.


Preheat oven to 200 degrees. Place ribs in a large baking pan (leave aluminum foil on) and bake for 6 hours, on the lowest oven rack. When you remove ribs they will be so tender that the meat will fall right off of the bone.


Life is good when you can make ribs this easy. Pop them in the oven in advance and forget about them until 6 hours later. The slow, low bake guarantees tender succulent ribs and the meat falls right off of the bone. So be ready to get your fingers dirty and eat those ribs cave man style. Enjoy!


I bake these in a large roasting pan. If you are making more then two racks at a time, lay them on their side to bake.

Wednesday, August 10, 2011

Shrimp Salad


  • 2 lbs. salad style cooked, peeled and deveined frozen shrimp, 100/150 ct
  • 2 cups mayonnaise
  • 1 tsp. ground white pepper
  • 1 tsp. mustard powder
  • 2 tsp. yellow mustard
  • 4-6 spring onions diced, green tops too

Place frozen shrimp in large bowl and thaw shrimp overnight in refrigerator. The next day drain shrimp in colander and set aside.


In a large bowl whisk together next 5 ingredients, set aside. Press paper towels into shrimp to sop up all extra moisture. When they are dry add to mayonnaise mixture and stir well. Chill overnight and serve the next day.


This salad is delicious on potato rolls. Or it is good on any bread or lettuce greens. I use Hellman's light mayonnaise and it still tastes rich and delicious. I prefer a small, tender shrimp in my shrimp salad. But you can use larger shrimp, if you wish.

Thursday, August 4, 2011

My Fig Tree


While I was a little girl, growing up in Philadelphia, the old Italians used to sit around talking about their fig trees. I used to think, they must lead a boring life to be so excited about old fig trees. Fast forward. Now that I'm getting a little older myself, I see that I must have been wrong. So I'm here to tell you about my fig trees.

There is nothing better than a fresh picked fig. Figs do not ripen once picked and need to be eaten soon thereafter as well. That my friend is where the store bought figs fall short. These figs will have you telling your friends how delicious they are. Watch out the young kids will think you are nuts. :)


One of the great things about fig trees is that they are one of the easiest trees to grow. They like to be in a sunny location, even planted in poor soil. We had removed the bushes from one side of our house to make room for our beloved fig tree, and I was constantly checking out my pitiful looking fig-stick all winter long. When springtime came around I was certain it was dead, but, alas, it was alive. Alive I say! The worry was real, and the joy was sincere once I saw it sprout. Little did I know, they are late blooming plants, and I was so happy to see the first leaves sprout. I love the look of the leaves as they appear to be almost tropical looking. My tree was planted last fall, and it already has a ton of baby figs on it. I can hardly wait for those sweet treaties to be ripe. They are like candy from mother nature. I hear that by the time the tree is 3 years old I should get 3 bushels of figs from the tree. My friends and family will be so happy as I share my treasures with them.

Thursday, July 28, 2011

Sauteed Portabellas and Spinach

  • Sliced Portabellas, about 6 oz. or so
  • fresh baby spinach leaves, about 7 oz.
  • 1 Tbsp. minced garlic in jar
  • Pam olive oil spray, or 2 Tbsp. extra virgin olive oil
You have two options for preparing this recipe.

Option #1: In a large nonstick skillet generously spray skillet with olive oil spray. Heat over medium heat, generously spray both sides of mushrooms and then place in skillet. If the mushrooms seem dry spray with more oil, as needed. Only turn mushrooms once when they are nicely browned. Then brown other side of mushroom adding garlic at this time as well. When nicely browned on second side add spinach on top of mushrooms, stirring as needed. As soon as the spinach is wilted remove from heat and serve immediately.


Option#2: In a large nonstick skillet add 2 Tbsp. of extra virgin olive oil. Heat over medium heat and spread oil around skillet evenly. Add mushrooms and cook until nicely browned, only turning once. When you turn mushrooms to brown second side of mushroom add garlic at this time. When second side is browned toss spinach on top of mushrooms and garlic, stirring as needed. When spinach is wilted remove from heat and serve immediately.
Monday, July 18, 2011

Asiago Bread

There is no reason to heat up your oven for some hot, cheesy bread this summer. I sometimes like to serve bread on the side in the summer, but who wants to heat up the kitchen. With a quick broil you can have your bread and eat it, too.

I love to serve this as a side with a chilled Greek Salad. Or with a Maryland crab feasty or steamed shrimpies. What ever you decide to pair this bread up with, you will be pleased. Everyone loves this simple to make bread and you will get compliments. Enjoy!!!


Asiago Bread

  • 1 multigrain loaf, sliced
  • Smart Balance margarine
  • garlic powder
  • Asiago cheese, grated
Ask the store to slice the loaf of bread if it isn't already sliced, this will be a time saver for you later. Spread a thin layer of margarine on one side of bread slices. Place slices on a very large cookie sheet, margarine side up, do not overlap bread or it will not broil evenly. Generously sprinkle garlic powder on top of bread slices. Then put about a tablespoon or so of Asiago cheese to cover the top of the bread. Place under broil on high and broil for 3-5 minutes. Remove as soon a cheese is melted and you may lighty brown it if you wish. Also you will probably have to do this twice since all of the bread will not fit across the sheet.

Monday, July 11, 2011

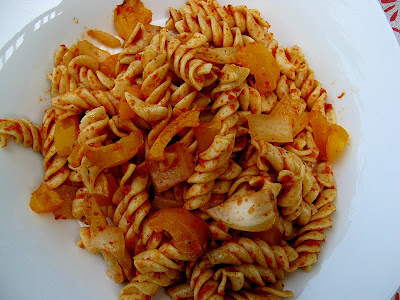
Pesto Pasta with Grilled Yellow Pepper and Onion

I hesitated posting this recipe just because of the availability of LeGrand Sundried Tomato Pesto. I found this treasure by accident at our local co-op, The Common Market. I brought it home to taste and thought, wow, this will be great on pasta with grilled sweet yellow pepper and grilled sweet onion. Now, when you bite into this, the flavor is so crisp and delicious. The sweet pepper and onion really compliment this pasta dish, adding a nice little sweet crunch to the pasta. Another benefit is that it is not mayonnaise based and this dish can survive the heat of summer. Now run don't walk to the Common Market in Frederick, Md, and enjoy this easy to make treasure. This is a keeper that will keep calling you back to the fridge for more.

Pesto Pasta with Grilled Yellow Pepper and Onion

  • 1 box Ronzoni Smart Taste Pasta, Rotini
  • 1 pkg. Le Grand, Sun Dried Tomato Pesto 5.5oz.
  • 2 small or 1 large sweet yellow pepper
  • 1 large sweet vidalia onion
  • Pam spray, olive oil
Boil pasta according to package directions.

Preheat gas grill to high. Meanwhile remove seeds and stem from pepper, then cut ends off of onion and remove outer skin. Cut onion in half legthwise. Spray pepper and onion with oil on all sides. Place on grill for about 10 minutes, turning occasionally. When done set aside on plate to cool.


To the cooked and drained pasta add the whole package of LeGrand Pesto, stir well until thoroughly mixed through. Dice onion and pepper into bite size pieces and toss in to pasta well. Chill for several hours or overnight.

Tuesday, July 5, 2011

Sweet Baby James

It seemed like an eternity for the little guy to arrive. He is here and I am now a Nonna for the first time. I soon found out that one of the best times of my life would be holding my grandbaby. It was love at first sight. I was able to sit and hold him and look into his eyes and his into mine. I was content to sit in the chair and hold him for three hours straight. Now that is something only a grandma can do.

My Aunt Veronica sent me the sweetest card and it said "Grandchildren make our hearts bigger and our souls deeper." So true!!!


Nonna


Sweet Baby James
  • 1 Katie Freeman
  • 1 Eric Freeman
  • lots of love
Take 1 Katie Freeman and 1 Eric Freeman, then throw in lots of love. Wait 9 months and Sweet Baby James is born. June 26th at 2:46am and 9 ½ lbs.


Tuesday, June 28, 2011

Red, Black & Blue Burgers

It's summer and it's grilling time. The 4th of July most certainly should be celebrated with a barbecue and of course burgers, center-stage. They are delicious and there are so many variations. So read on and check out my new version. It was a big hit at my house and it is sure to be at your home, too. We love the 4th of July because it is such a festive holiday and we love fireworks. My Stud Muffin has earned the nickname Pyro Pop for his love of lighting fireworks. I believe he has passed that gene on to our two sons as well. Let's celebrate of the Declaration of Independence.


Red, Black & Blue Burgers


  • 2.4 lbs. 90% lean ground beef
  • cooking spray
  • 5 oz. container of crumbled blue cheese
  • 3 ripe red tomatoes
  • 1 medium red onion sliced thin
  • Blackened Seasoning Mix
Evenly divide meat into 7 equal size balls. Then patty into a nice think burger. Place burgers on an oil coated platter covered with plastic wrap in the freezer for about 35-45 minutes. This will chill the burgers real well to make it easier to slice in half.

When chilled thoroughly remove from freezer. Place on cutting board and using a serrated bread knife gently and slowly saw burger in half, being careful not to break up burger. Then on one half of burger place a heaping 1 Tbsp. of crumbled blue cheese. Place other half on top and press edges together to seal and then patty together well with your hand. You may cover and refrigerate to cook later or immediately cook them on the grill. I like to prepare mine a few hours in advance.


Just before you grill burgers gently shake the blackened seasoning on both sides of the burgers, lightly covering. We cook ours on a gas grill on high for 14 minutes, 7 minutes on each side, only turning once. I also like to coat the hamburger buns on the inside with olive oil and grill oiled side down for the last 1-2 minutes the burgers are cooking.


This will make 7 big burgers and if you are a wimpy crybaby about spice don't put it on yours. It really is not hot, just a nice flavor. No crybabies allowed. Serve this up on the buns with a slice of red onion and tomato. Enjoy!!!