Tuesday, December 17, 2013

The Healthier Nacho

  • 1 Tbsp. chili powder
  • 1 tsp. onion powder
  • 1 tsp. paprika
  • 1 tsp. garlic powder
  • ½-1 tsp. ground chipotle powder
  • ½ tsp. cumin
  • ½ tsp. salt
  • ¼ cup ketchup
  • ¾ cup water
  • 1.3 lb. Shady Brook Farms ground turkey, 99% lean
  • 1 medium sized diced sweet onion
  • 1 can fat free refried beans, 16 oz.
  • 1 jar pickled jalapeño slices
  • 1 bag Utz Baked Tortilla chips
  • 1 (8 oz.) pkg. Sargento 4 Cheese Mexican reduced fat cheese
In a small bowl mix together first 7 ingredients. In a 2-cup measuring cup put ketchup, water and spice powders. Whisk together and set aside.

Brown ground turkey and onion in a medium nonstick skillet sprayed with cooking oil and cook over medium heat. When meat is no longer pink and is cooked through add spice mixture to meat while stirring well until all meat is coated. Add refried beans and simmer uncovered for 5 minutes. Preheat oven to 450º at this time if you are going to bake them.

You need to decide whether or not you would like to bake or microwave them.
• Option #1: Bake at 450º on a cookie sheet for about 8 minutes or until cheese is melted.
• Option #2: Microwave on plate until cheese is melted, my microwave took 60 seconds.

Now that you have decided whether or not you want to microwave or bake, prepare the munchies. Place chips in a single layer on a plate or cookie sheet without any gaps and a spoonful of the turkey/bean mixture onto each chip then top with grated cheese and some jalapeños.

You may make the turkey/bean mixture aday ahead if you wish, just heat mixture up before preparing Nachos. Also you may add additional toppings such as sliced black olives, freshly chopped green onion, fat free sour cream, etc.

Tuesday, December 10, 2013

DIY Kissing Ball Project

Supplies list
  1. Five to six inch wet foam ball, clink on this link to see.
  2. Decorations such as: pine cones, red berries, mini X-Mas balls, ribbon at least 3ft long, and wire.
  3. Bucket.
  4. 4 large pine branches cut into pieces into 6-7 inches long with about a 2 inch stem to stick into foam ball.
  5. Wire to hang ball, I recommend bending an old wire coat hanger.
  6. Make sure you wear long sleeves and gloves because the pine is very prickly.
Directions
  1. Soak foam ball in bucket filled with cool water for about 10 minutes.
  2. Send your Stud Muffin outside to cut the pine branches.
  3. Place wire through the wet foam ball leaving a 3 inch stem at bottom then bend it at a right angle. This will stop the ball from slipping back out and you will have a spot to hang the ribbon on the bottom wire. I recommend you do this over a sink or a bucket as it will drip the whole time.
  4. Start at the bottom of the ball and start sticking pine cutting into the ball in a random order about an inch apart.
  5. After the ball is full of greens then randomly add decorations.
  6. Attach ribbon onto the bottom of wire sticking through the ball.
  7. Hang outside and spritz with water everyday. Last year our lasted for many months.
      This is a messy project and it would be best done in a utility sink, basement or garage.

Thursday, December 5, 2013

Apple Praline Cake

I nailed this one on the first try, oh how I love that! If you want an easy to make moist cake then this baby is for you. I only wanted to take one taste test bite but I made all gone with mine because it was so scrumptious. A perfect dessert for the holidays and you don't have to tell them that it starts with a cake mix. We can keep a secret.

Apple Praline Cake
  • 1 box Duncan Hines yellow cake mix
  • 1 can Apple pie filling, 20 oz.
  • 2 tsp cinnamon
  • 2 eggs, beaten
  • 1/8 cup canola oil
  • 1/8 cup water
  • 1/2 cup unsalted butter
  • 1/2 brown sugar, packed
  • 1/2 cup pecan pieces
Preheat oven and bake according to package directions but do not follow their mixing instructions. In a large bowl sift together 1 tsp. cinnamon with the powdered cake mix, then set aside. This step will blend the cinnamon well and remove unwanted lumps when mixing later on.

In a medium size bowl mix 1 tsp cinnamon with the apple filling mix until well blended. Then add to the cake mix; apple mixture, eggs, oil and water. Stir well by hand and mix thoroughly through, mixture will be thick and mud like.

Bake according to package instructions or until cake tester comes out clean, mine took about 38 minutes. Meanwhile toast pecans over medium heat in a 12 inch non stick skillet stirring occasionally while toasting them, this will take about 8-10 minutes, then set aside to cool.

Once cake is baked remove from oven and set cake pan on a wire rack to cool for 10 - 15 minutes. Meanwhile as the cake is cooling on a rack it's time to melt the brown sugar and butter in a medium size saucepan whisking constantly over a medium heat. Slowly bring to a boil for 1 minute then turn off the heat, leaving the pan on the stove. You want to make sure the sugar is melted and not gritty, it will take about 8 to 10 minutes.

As soon as butter/brown sugar mixture is ready invert the cake onto plate and immediately drizzle the mixture on the top and then sprinkle on the pecans.

This would bake well in a 9 x 13 inch cake pan. Pour brown sugar mixture over top of hot cake as soon as it comes out of the oven, then sprinkle pecans evenly over the top.

Tuesday, November 26, 2013

Sassy Egg Salad

This is what a perfectly cooked hard boiled egg looks like. Notice that the yolk is yellow and just cooked all the way through. The yolk is moist and the white of the egg is tender. An overcooked egg has a green ring around the dry yolk and the white part is tough. I remember asking my Mom why hard boiled eggs looked like that when I was a kid, she said that is what happens when you hard boil them. Needless to say I did not like hard boiled eggs until I had them cooked the right way. Sorry Mom.

Now on to the Sassy Egg Salad. Yummy! It's nice and spicy but not too hot, just right. It's time to revamp the old traditional Egg salad with some pizzazz. Sometimes I just get tired of eating the same old thing. I'll tell you that this is a satisfying sandwich for lunch. I loved mine on a pretzel roll but any nice roll or bread will do. Make those fat cells and taste buds sing with delight. Enjoy!


Sassy Egg Salad
  • 6 large eggs, hard boiled
  • 1/3 cup mayonnaise 
  • 1/2 tsp yellow mustard
  • 1/4 tsp mustard powder
  • 1/4 tsp paprika
  • 1/4 tsp cayenne pepper
  • 1/4 tsp salt
  • 1/8 tsp white pepper
  • 2-3 green onion trimmed and sliced thin, green tops too.
This is how to hard boil the perfect egg. Do not use fresh eggs, they are too hard to peel. Get rid of your older eggs with dignity. Not expired ones!  Place eggs in a large pot big enough for a single layer, then add enough cold water and 1 tsp salt to cover eggs and bring to a boil uncovered. As soon as you see big bubbles start to come up lower it to a simmer at just below boiling. Immediately set your timer for 10 minutes. When the timer goes off take the eggs to your sink and start running cold water over them until cool. Once cooled you may remove them from the cold water bath and chill overnight in the fridge. Or you may speed up the cooling down time by adding some ice to the pot and wait about 30 minutes for them to chill down.

Slightly crackle the eggs shells and gently peel away. I find that it helps to start at the wide end of the egg and peel down while running cold water over egg while peeling. Once all eggs are peeled slice in half. Chop eggs for the salad and you get to choose how chunky you want it. Add eggs to a large bowl and add remaining ingredients, gently mix well with a soft spatula. Chill until ready to eat, but it tastes even better if you chill it overnight for the flavors to meld.

This is a zesty egg salad and it screams for a hearty roll. I had mine on a pretzel roll and it was perfect. Enjoy!

Wednesday, November 13, 2013

Shrimp Fried Rice

I just love this recipe! It's pretty easy to make and it is so flavorful. I use brown rice in this one and it still tastes great. I always try to slip in something to make it a little healthier to eat but I refuse to compromise on flavor. Enjoy!

Shrimp Fried Rice
  • 2 cups white or brown rice
  • 2 large eggs, beaten
  • cooking spray
  • 1 Tbsp. canola oil
  • 1 cup green onion cut into ½ long, green tops too
  • ½ cup frozen petite peas, thawed
  • ½ cup grated carrot
  • 1 Tbsp. bottled minced garlic
  • 1 tsp. freshly grated ginger
  • 1 Tbsp. rice wine
  • 3 Tbsp. soy sauce
  • 1 Tbsp. hoisin sauce
  • 1 tsp. dark sesame oil
  • 16 oz. cooked diced chicken, or, 16 oz. peeled and deveined cooked salad style shrimp 100/150 ct. (optional)
Cook rice according to package directions.

Mix together  rice wine, soy sauce, hoisin sauce, and sesame oil, set aside

Meanwhile in a small 8 inch nonstick skillet sprayed with cooking oil over medium heat, scramble the eggs, set aside. In a large 12 inch nonstick skillet over medium heat, add the canola oil. When heated up add onions, peas, carrots, garlic and ginger, sauté for 2 minutes.

Add cooked rice to skillet with vegetable mixture, add soy mixture and scrambled egg, stirring constantly. If adding chicken or shrimp do so now. Stirring constantly for about 2 more minutes, or until mixed well and all is heated through.

Wednesday, November 6, 2013

Jewish Apple Cake

It's Fall and this is a great way to use up our bounty of fresh apples that are in season now. Get rid of those crispy critters with dignity! I may be Italian but I make a mean Jewish Apple Cake. I'll tell you that my Mom made this cake more times then I could count. So her memory lives on in this recipe.

This one tastes like Apple Pie in a cake form. Now that sounds scrumptious doesn't it? Life is too short, eat dessert first. Enjoy!


Jewish Apple Cake
  • Peel 5 small apples and cut into small pieces.
  • ¼ cup sugar
  • 1 Tbsp. cinnamon
  • 3 cups flour
  • 2 cups sugar
  • 1 cup canola oil
  • 4 eggs
  • ¼ cup orange juice
  • 3 tsp. baking powder
  • 2 ½ tsp. vanilla
  • 1 tsp. salt
Preheat oven to 350 degrees. Prepare apples and place in a large bowl. In a small bowl mix together 1 Tbsp. of cinnamon and ¼ cup sugar, then stir into diced apples and mix well, set aside.

Add next 8 ingredients and beat with an electric until smooth. Pour half of batter into a greased & floured 10 inch tube pan. Arrange apple mixture over top of batter evenly, then pour remaining batter on top of apples. Bake for 65-75 minutes or until toothpick inserted in center comes out clean and cake is golden brown. Remove from pan and let stand on rack to cool for 30 minutes.

My mom made this cake more times then I could count. It was one of her favorites. I like to use McIntosh or Cortland apples, or you may use any firm apple of your choice.


Wednesday, October 30, 2013

Baked Eggplant Parmesan

My buddy Emily inspired me to make this one. I was visiting her at her house and she picked 2 eggplants out of her garden for me. Thank you Em!

I love Eggplant Parmesan but I find that when it is fried it soaks up the oil. So this is a way to cut back on fat and the mess of frying, too. Double dipping, I just love that. I actually like this version much better too. Mangia!


Baked Eggplant Parmesan
  • 1 or 2 eggplants
  • 2 eggs, beaten
  • ¼ cup milk, I used fat free
  • about 2 cups panko bread crumbs
  • 1 jar pasta sauce, I used Muir Glen Organic Roasted Garlic
  • Pam Olive oil spray
  • Sargento reduced fat grated, 4 cheese Italian
  • grated Parmesan cheese
Preheat oven to 375 degrees. Meanwhile slice eggplant into 1/2 inch thick slices. I had a small eggplant and a medium one that made 12 slices.

In 2 medium size bowls add the eggs and milk and mix well then add panko to the other bowl. Dip eggplant into egg mixture, then into panko pressing into panko on both sides. Place on a large baking sheet coated with olive oil spray. When all are coated spray the top of the eggplants with the oil too.

Place in oven and total bake time is 40 minutes but you will need to flip the eggplant after 20 minutes and spray the tops with oil, back to the oven it goes for 15 more minutes.

Meanwhile microwave about half of the jar of pasta sauce until it is hot. Remove eggplant from oven and add the hot pasta sauce on top, then the grated cheeses, cook for 5 more minutes or until cheese is melted and it's golden brown on top.

Easy clean up tip: Line baking sheet with foil before baking.

Wednesday, October 23, 2013

Baked Beef Stew

Baked Beef Stew for a crew. This recipe is so easy you just throw the ingredients into a roasting pan and bake. No need to brown the meat and it makes its own gravy. Now how cool is that! The meat is so tender and it is a nice hearty meal for a cold chilly day. Warm up your chilly bones from the inside out. Comfort food = Love.

Baked Beef Stew
  • 3 14.5 oz cans diced tomatoes in juice
  • 3 cups water
  • 1/2 cup plus 1 Tbsp. Minute Tapioca
  • 1 Tbsp. Worcestershire sauce
  • 1 Tbsp. salt
  • 1 Tbsp. sugar
  • 1 tsp. freshly grated black pepper
  • 1 tsp. granulated garlic powder
  • 3 bay leaves
  • 3 slices bread, crust removed and cut into cubes
  • 2 cups onion cut into chunks
  • 2 cups celery cut into chunks
  • 1 lb. bag of baby style carrots
  • 8 cups of potatoes cut into chunks, skin on or small baby potatoes w/ skin on
  • 4 1/2 lb. Beef Stew meat
  • cooking spray
Preheat oven to 375 degrees. Meanwhile add first 10 ingredients into a very large bowl and mix well, make sure you break up bread pieces it is important. Then add the rest of the ingredients. I cut the meat into smaller chunks if they are really large and trim off  any membrane if there is any, the size of the meat and potatoes is your preference.


Spray a large roasting pan (17 x 14 x 31/2 inches) with cooking spray. Place stew mixture into pan and cover with foil, bake on center rack for 2 1/2 to 3 hours or until meat is tender. Remove from oven and carefully remove foil, serve immediately. Enjoy!

This would be a perfect meal for the crew if you are on ski trip, hunting, cross country skiing, etc.  A great meal for a cold days activities if you want an easy to fix meal that will satisfy. This is a variation on a recipe that I found years ago in The Taste of Home magazine.

Wednesday, October 9, 2013

Manhattan Clam Chowder

There is nothing better on a cold fall day than a hot bowl of chowder to warm up your chilly bones from the inside out. This recipe is doubly delicious because not only do you get to eat these tender clams but you get your veggies too.

You may notice that I use soup base in my soups all of the time. I swear it makes the best tasting soups ever! I have to order mine online, but you can get the chicken and beef bases at the wholesale food clubs in the spice aisle.


Manhattan Clam Chowder

  • 10 cups water
  • 1 6 oz. can tomato paste
  • 1/3 cup clam base
  • 1 tsp. dried thyme
  • 1/2 tsp. celery seed
  • 1/2 tsp. freshly ground black pepper
  • 2 bay leaves
  • 1 16 oz. bag of frozen petite peas
  • 1 14 oz. bag of frozen lima beans
  • 1 16 oz. bag of frozen white corn
  • 1 16 oz. bag of frozen cut green beans
  • 3 stalks celery, finely diced
  • 1 1/2 cups carrots, chopped
  • 1 med sweet onion, finely diced
  • 2 cups potatoes, chopped into bite size pieces, I like to leave the skin on but it's your choice
  • 1 1/2 cups carrots,finely diced
  • 1 51 oz. can of Chopped Ocean Clams
In a large 8 qt. or larger soup pot add the first seven ingredients and bring to a boil, stir soup base and tomato paste to break up and mix evenly. 

Meanwhile, prepare remaining fresh veggies. After soup broth comes to a boil add veggies and bring to a boil again. Then lower heat to a simmer, cover and cook for 45 minutes.

Then drain juice from canned clams into soup pot but reserve the clams and set aside for now. Bring soup back up to a boil again then stir in the clams and cook for about 5 more minutes. I do this so as to not overcook the clams and make them tough.

Remove bay leaves and serve immediately. Enjoy!

Wednesday, September 25, 2013

Shepherd's Pie

When my Stud muffin and I got married, this was the only recipe that he had me ask my MIL for, Shepherd's Pie. She was surprised that this was the one that he wanted. Through the years I have altered it to make it lower in fat (98% fat free cream of mushroom), but you can do the original version if you so choose. It's nothing special to look at but it is very tasty. Seems to me you could turn it up a notch by sautéing 8 oz. mushrooms (sliced thin) and adding about 1 cup of frozen petite peas (thawed, of course) to meat mixture. Also, I must say that a yellow meat potato makes the best tasting mashed potato. It's a nice frugal but tasty casserole for the chilly days ahead. Leftovers microwave well. Enjoy!

Shepard's Pie

  • 1¼ lb. Ground Turkey 99% lean or Ground Beef
  • ½  cup diced onion
  • 1 can Cream of Mushroom Soup 98% fat free, undiluted or high test
  • 1 Tbsp. Worcestershire Sauce with turkey or if using beef use 3 Tbsp.
  • Mashed potatoes, already prepared
  • cooking spray
Preheat oven to 350 degrees. Meanwhile brown meat and onion in nonstick skillet sprayed with cooking oil. Cook until meat is cooked through and no longer pink, only drain fat if using beef and set aside.

In a large bowl whisk together soup and Worcestershire sauce and mix well. Stir in meat mixture, coating  evenly.

Spray a casserole dish with cooking spray and spread meat mixture evenly into casserole dish.

Then place a layer of mashed potatoes over top, about 1 inch thick. Bake uncovered for 30 minutes at 350 degrees.

Wednesday, September 4, 2013

Fiesta Chicken Casserole

I love spicy and this one will warm you up from the inside out. No spice wimps are allowed to try this one, i.e., no cry babies. This version is lower in fat, but big in taste. It's a double win when spice and low fat come together so deliciously. The cool fall days will soon be here for you to enjoy this one.

Fiesta Chicken Casserole 
  • About 4 cups leftover diced chicken
  • 1 4 oz. can diced green chiles
  • 1 16 oz. can black beans, drained & rinsed
  • 1 14.5 oz. can salsa style fire roasted diced tomatoes
  • 1/2 cup hot salsa
  • 1 Tbsp. Chili powder
  • 1 tsp. onion powder
  • 1 tsp. paprika
  • 1 tsp. garlic powder
  • 1 tsp. ground chipotle powder
  • 1/2 tsp. cumin
  • 8 flour tortillas, 6 inch size
  • cooking spray
Topping
  • 1 2.25 oz. can sliced black olives, drained
  • 1 jar sliced pickled jalapenos, only using desired amount
  • Sargento 4 cheese Mexican reduced fat cheese, 8 oz.
  • Utz baked Tostitos, 2 cups crushed
Preheat oven to 350 degrees. Spray a large nonstick skillet with cooking spray and add first 11 ingredients. Simmer over medium heat for about 5-10 minutes. Meanwhile spray a 9x13 inch Pyrex dish with cooking spray, then evenly cover bottom and side with tortillas, overlapping slightly.

After simmering the chicken mixture, spread evenly over tortillas. Top mixture in following order: crushed Tostitos, cheese, olives and jalapenos. Bake at 350 degrees for 35 minutes. Enjoy!

Wednesday, July 31, 2013

Italian Style Green Bean Salad

Easy to make, low calorie and low fat never tasted so good. A recipe will not get any easier then this one, but do not be fooled as it is tasty, too. Cool beans for a hot day. Enjoy!

Italian Style Green Bean Salad
  • Two 14.5 oz. cans green beans, drained
  • 4 slices red onion, sliced thin, then quartered
  • 1/4 cup light balsamic dressing, I used Ken's light options
  • 1/4 tsp. dried Oregano
  • 1/2 tsp. Garlic, chopped from jar
  • Freshly ground black pepper to taste
Drain green beans and place into a large mixing bowl. Add remaining ingredients and cover, chill for several hours or overnight.

Tuesday, July 23, 2013

Giant Basil

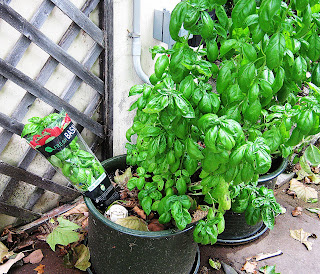
I'll tell you my secret to growing "Mutant Basil" and it is so simple. My Stud Muffin came up with the solo cup idea for support and it really makes a difference. How about that, another clever use for the Red Solo cup.

I love fresh basil on tomato and mozzarella salad, Tuscan Bean Salad, and of course in my spaghetti and pesto sauce just to name a few. I use fresh snippings all summer long, just remember to never take off more then 1/3 of the plant at a time. 

Right around the end of September my hubby picks off the leaves from the plants for me. Then I wash and dry the leaves well, at this time I will freeze the rest of the leaves for pasta sauce in the winter. Just load into a Ziploc freezer bag with the freshly washed leaves and pop into the freezer. This is my favorite trick as you will not need to chop the basil, it will crumble easily once it is froze. You may also make pesto and  freeze in ice cube trays and then load cubes into Ziploc freezer bags. Enjoy your summer's bounty all winter long.

How to grow Giant Basil plants
  • 1 live Basil plant, from grocery store produce section
  • Miracle Gro Moisture control potting mix
  • red solo cup, it has to be red (just kidding)
  • 1 large ceramic pot with drain holes
  • small stones
After the danger of frost when it is starting to warm up outside in spring is the best time to plant. I have found they do well planted directly into the ground as well if you don't want to use a planter. I live in Maryland so that is mid May to early June for me.

I like to line the bottom of the ceramic pot with about 1 inch of small stones. Then fill to the top with soil and press soil down with your hands to compact it. Dig out a small hole that is just deep enough to cover the soil mound and roots that are on the bottom of the basil plant.

Remove basil from plastic bag and plant in soil and press firmly around the edges. Then cut down one side of the solo cup to the bottom and then cut the bottom completely off. Now open the cup up and warp it around the Basil plant and this will hold the plant up until if gets strong enough to stay up on its own.


How do you like my little happy face? When it is strong enough to stand tall by itself carefully remove the cup. Keep basil moist but not saturated. My plants do well in partial sun, beside my basement door right up against the house. The cup holds the plant up and lets is still spread out some.

Don't forget to pinch off flowers as you do not want the plant to go to seed. Also your Basil will grow better if you use it regular and if you do not just prune some off.

Wednesday, July 17, 2013

Bang Bang Chicken


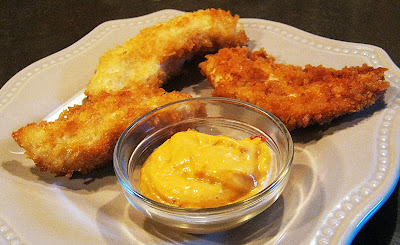
Bang Bang Chicken Tacos or Bang Bang Chicken Tenders, you decide. I love spicy and I love crispy too, you can have both with these babies. Dinner or appetizer, you cannot go wrong. Quick and easy, oh, how I love that. Enjoy!

Bang Bang Chicken
  • ½ cup Hellman's light mayonnaise
  • 1 - 2 Tbsp. Tuong ot Sriracha sauce & extra for garnish
  • 1 - 2 Tbsp. Sweet Chili sauce, by Maggi Taste of Asia
  • 1 tsp. rice vinegar
  • 1 cup Panko bread crumbs
  • About 1 lb. Chicken Breast Tenderloins
  • 2 cups Canola oil
Trim chicken of cartilage with kitchen scissors if there is any. Add 1 cup of Panko to large dinner plate and press tenderloins one at a time into Panko on both sides of chicken. Cover and refrigerate after all are coated.

In a large nonstick skillet add canola oil and heat over a medium heat. You can tell when oil is hot enough by dropping in one Panko bread crumb, if it has bubbles around it and starts to brown the oil is hot enough. You may want to use a splatter screen for the top of the skillet. Place tenders into oil and cook on both sides for 4 minutes or until no longer pink in center. After both sides are cooked place on a paper lined serving platter to drain excess oil.

You may serve these with the sauce on the side for dipping or coat tenders with sauce and serve as a soft taco. If you like your tacos spicy add more Sriracha sauce.

I had a 1.18 lb pack of Chicken Breast Tenderloins and it made 8 chicken tenders.

Wednesday, June 26, 2013

Shrimp Cocktail

 This is my Stud Muffin's favorite appetizer. It is so quick and easy. Also you may prepare it in advance, I just love that. Now you can scrounge up any kind of glass for this, martini, margarita, etc. You can prepare this and eat it right away or wrap plastic over and refrigerate until ready to eat. A nice cold app for a hot summer day.

Shrimp Cocktail
  • I bag frozen salad style precooked shrimp 100-150 per pound, only using 3 cups
  • Chopped lettuce of your choice
  • 4 martini glasses
  • 1 lemon
Cocktail sauce
  • 1/2 cup ketchup
  • 1/8 cup horseradish in jar
  • 1 1/2 tsp freshly squeezed lemon juice
  • 1/8 tsp. mustard powder
About 24 hours before place frozen shrimp in air tight container in refrigerator to thaw. The next day mix together the cocktail sauce and chop the lettuce. Drain shrimp in wire mesh strainer and pat dry with a clean paper towel or two.

Place chopped lettuce in martini glasses then top with shrimp and a generous dollop of cocktail sauce. Serve with a wedge of lemon on the side. Enjoy!


Wednesday, May 29, 2013

Jalapeno Hummus

Hummus so expensive to buy, yet so inexpensive and easy to make. It makes for a great dip or a nice roll up and it's healthy to boot. So you may want to serve this as a dip with crackers or pita chips. Also it makes a great roll up. I like to add fat free Feta, onion slices and lettuce or broccoli slaw to my tortilla roll up. Guess what I had for lunch today. Yum yum!

Jalapeno Hummus
  • 1 can Goya Garbonzo beans (1 lb, 13 oz.), drained & rinsed
  • 1/2 tsp. garlic powder
  • 1/2 tsp. salt
  • 1/2 cup olive oil
  • 1/2 cup water
  • 1/3 cup pickled jalapeno slices 
Add above ingredients into a food processor and whirl for 1-2 minutes or until smooth. Refrigerate overnight to let flavors meld. Serve with crackers, pita crisps, or make a hummus roll up for lunch.

Wednesday, May 22, 2013

Mac and Cheese for a Crowd

I just love it when I do a make-ahead dish for a crowd. I came up with this variation when we were having a crab feasty at our house. There were some young kids coming and they requested Mac & Cheese for the little ones. Seems to me the adults there enjoyed it just as much as the kids did. This was perfect because it stayed hot while the people straggled in to eat. It's makes for a flexible meal schedule. Who doesn't need that these days. Enjoy!

Macaroni & Cheese for a crowd
  • 1 16 oz. box elbow macaroni
  • 1/2 cup salted butter
  • 1/2 cup all purpose flour
  • 1 tsp. salt 
  • 1/2 tsp freshly ground black pepper 
  • 5 cups milk
  • 4 cups shredded Cheddar cheese
You will need a crockpot with a warm setting and a removable crock. Cook pasta according to package directions
adding 4 minutes to longest suggested cooking time. This will make your Mac & Cheese more tender.

Meanwhile place crock into oven then preheat oven to 350 degrees leaving crock to heat up with the oven.


In a large saucepan over medium heat, melt butter. Then blend in flour, salt & pepper; gradually whisking in milk. Add cheese and stir until cheese is melted. In a very large bowl mix together cheese mixture with cooked pasta.

Remove preheated crock with hot pads and be careful not to get burned. Spray crock with cooking spray;  add Mac & Cheese to crock.

Place crock back into the oven and bake for 45 minutes. Then remove from oven and stir mixture together well, you will notice some separation; place crock into heating element and turn onto warm setting. This will feed a large crowd and stays hot in the crockpot. A great make ahead side for a get together.

Thursday, May 16, 2013

Skinny Caesar


My Stud Muffin just loves a Caesar salad and he eats one every chance he can get, yes that's my chubby hubby. They can be so high in fat and my guy does not need that. So hence this is my version of "The Skinny Caesar." I managed to cut back on the fat without cutting back on the flavor. You can always top this with some grilled chicken or shrimp so it can be a side salad or a complete meal. This recipe is for one main meal salad or two side salads. If you want to make lots just remember 1 part salad dressing to 2 parts sour cream. Hot days ahead call for a cold salad for lunch or dinner. Lower fat, quick and easy, it doesn't get any better then that. Enjoy!

Low Fat Caesar Salad 
  • 1 head of Romaine lettuce
  • 1/2 cup fat free sour cream
  • 1/4 cup Ken's Steak house Lite Caesar salad dressing
  • Shredded Parmesan
  • Croutons
  • Freshly grated Black Peppercorns, to taste
  • Anchovies, strictly optional here
Place salad plate in freezer to chill. Then wash and chop Romaine and place in a large bowl. Dry off excess water on lettuce with a paper towel and set aside. Meanwhile in a small bowl whisk together sour cream and salad dressing. Pour mixture onto lettuce and toss until completely coated well. Place salad on a chilled plate and top with black pepper, parmesan cheese, croutons, and anchovies. Serve immediately.

Wednesday, April 17, 2013

Italiano Tofu Sandwich


Tofu has a bad rap in some peoples mind, so please keep an open mind and try this baby. I remember my Stud Muffin saying to me, "Don't you ever serve me tofu again." Well, years went by and I was intrigued to try it again. Oh how I just love a challenge. It's the mushy texture and the zero flavor that turn off most people. Folks seem to love it or hate it. But I'm here to tell you there is still hope and to give it one more try my way. I quickly found out that the flavored and baked tofu has great potential. So I made my version of an Italian inspired tofu sandwich. Voila!  When I told my hubby that I was making this sandwich for the food blog and it would be for his lunch tomorrow he was happy and he said "I love that sandwich." I hope you love it too.
Enjoy!

Italiano Tofu Sandwich
  • 4 slices of Kalamata Olive Bread
  • 1 package of Baked flavored Tofu 6 oz., (savory) or flavor of your choice
  • 2 slices of Sargento reduced fat Provolone 
  • 1 jar 6 1/2 oz. Goya, Fancy Pimientos
  • Sweet or Red onion, sliced very thin
  • Sprouts of your choice
  • Balsamic Salad dressing, I used Ken's light options
  • Fresh Basil

You will only need 4 slices of the bread, so you may freeze or refrigerate the rest for later use. Prepare sandwiches ingredients in order:
  1. Open tofu and slice, evenly cutting both pieces into half lengthwise (reducing the thickness of it). Layer 2 tofu slices per sandwich onto bottom slice of bread.
  2. Then place 1 slice of provolone on top of tofu, reserving the rest of cheese for later use.
  3. Open jar of pimientos and carefully pull out of jar with out breaking up, pat dry with a paper towel, then cover top of tofu with a single layer of pimento. You probably will not use all of it, refrigerate unused pimientos for later use.
  4. Layer two thin slices of onion on top of pimentos. 
  5. Then add sprouts to cover generously and drizzle them with salad dressing.
  6. Add freshly ground black pepper and sea salt to taste. 
  7. Cover up sprouts with fresh Basil leaves (stems removed), this will take the place of lettuce. Place second slice of bread on top and cut into half, serve immediately. Serves 2.

You may make this the night before for your lunch the next day. Just wrap up in plastic wrap and refrigerate.

Wednesday, April 10, 2013

Gouda and Babybel Snacks


OK, Feasty Fans, we're double dipping this week with two recipes. They both taste the same so you pick which one you would like to try. If you want a quick and easy appetizer that tastes delicious, then this baby is for you. I managed to cut back on the fat and sugar without compromising the flavors. Maybe a little wine to go with your cheese appetizer. Enjoy!


Mini Encrusted Baked Gouda Pouches
  • 8 light Babybel cheeses, unwrapped
  • Pillsbury Reduced Fat Crescent Rolls
  • 1 egg, beaten
  • optional dip #1: Smucker's sugar free Blackberry Jam
  • optional dip #2: Dijon mustard

Preheat oven to 375 degrees. Meanwhile unwrap plastic and wax from Babybel's and set aside. Open crescents and divide into 8 sections. Then wrap one section around cheese circle pinching seams together carefully and covering completely on crescent dough. Space evenly on ungreased cookie sheet and with a pastry brush on egg on top of crescents to make dough golden brown. Then bake for 13 minutes or until golden brown.

Tip: You may use the mustard or jelly as a dip after baking or you may put 1/2 tsp of mustard or jelly on dough before you wrap cheese with crescent and bake the jelly or mustard in it. They are very good left plain too. Makes 8 mini baked cheeses.


Mini Baked Babybel Cups
  • 8 light Babybel cheeses, unwrapped
  • Pillsbury Reduced Fat Crescent Rolls
  • Smucker's sugar free Blackberry jam or Dijon mustard

You will need a mini muffin pan for this recipe. Preheat oven to 375 degrees. Open the cheeses, cut then in half (like a half circle) and set aside. Then open Crescent rolls and divide into 8 sections, then cut each section in half (not in half long ways).  Place dough into mini muffin wells and add either 1/4 tsp mustard or jelly onto dough, then top with cheese half. Bake for 9 minutes or until golden brown. Makes 16 mini cheese cups.

Thursday, April 4, 2013

Tex Mex Eggs

I feel sorry for the poor people out there who do not enjoy spicy food, but no cry babies allowed. I have loved spicy food for as long as I can remember. Also, my taste buds crave some excitement around here. This one is light, done-right, too. So fool those fat cells into singing, while keeping it low in fat. I keep thinking that a few slices of canadian bacon or crispy bacon on the side would be great for the meat mongers as well. With or without meat this is a real treat for the taste buds. Enjoy!

Tex Mex Eggs
  • 1/2 cup diced sweet onion
  • 3/4 cup diced Roma tomato
  • 1 4 oz. can diced mild green chiles
  • 1 16 oz. container of Egg Beaters
  • 1 egg, beaten
  • 1/4 cup fat free milk
  • salt & pepper to taste
  • 1 cup Utz baked tortilla chips, crumbled
  • 4 slices of Sargento reduced fat pepper cheese slices
  • Pickled jalapeno slices from jar for garnish
  • Pam cooking spray
Spray a nonstick 12 inch skillet with Pam and heat on medium heat. Add onion and stir occasionally until it just starts to brown. Meanwhile, in a large bowl, mix together tomato, green chiles, Egg Beaters, egg, milk, salt, pepper, and cheese broke into bite size pieces. After onion is cooked spray the skillet one more time with cooking spray and add egg mixture and tortilla chips, mixing well. Stirring with a soft spatula and cook just like scrambled eggs. Once eggs are set and thoroughly cooked serve immediately with jalapeno slices. Serves 6. 

If you would like add some meat to this dish I suggest some ham or crispy bacon, cooked in the eggs or on the side.

Wednesday, January 16, 2013

Balsamic Dijon Chicken Breast


The reason I love to marinate meat is to infuse the flavors and with the right ingredients it will tenderize it as well. I am happy to say that this recipe does both. The chicken was so tender and moist. I can see where this one can become a family favorite. So try a new one, I don't know about you but as much as I have my old favorites I crave a new recipe at times.

Balsamic Dijon Chicken Breast
  • 4 Tbsp. Dijon mustard
  • 3 Tbsp. Balsamic vinegar
  • 1 Tbsp. Olive Oil, extra virgin
  • 1/4 tsp. dried Thyme
  • 4 Chicken breast halves, boneless and skinless
  • 1 large gallon size Ziploc freezer bag
In a small bowl mix together first 4 ingredients well with a wire whisk. Place chicken breast in bag and add marinate, seal and refrigerate overnight or at least 6-8 hours.

We cooked ours on our gas grill on high at 400 degrees by a direct cooking over flames for 12 minutes. Of course every grill is different, just cook until no longer pink inside. Or you may bake it at 350 degrees for 30 minutes until no longer pink inside.

If you want a tender moist chicken breast then this is a must try for you. I believe this marinade would go well on pork or beef too, even though I did not try it. Enjoy!

Wednesday, January 9, 2013

Bok Choy Salad


 Tis the season to try to make up for a few extra pounds over the holidays. The dreaded reality has set in and now we either pay the price or eat our way into a slimmer person. I'm here to tell you that yes, you can do that. The trouble with me is that I like to eat and I want to eat food that tastes good, and sometimes it can be hard to compromise calories and flavor. So, this is my low calorie version of Bok Choy Salad. It is so good I'll bet you can't eat just one serving.

Bok Choy Salad
  • 1 Bok Choy, chopped
  • 6 - 8 green onions, chopped
  • 1/2 cup Splenda
  • 1/4 cup extra virgin olive oil
  • 1/4 cup cider vinegar
  • 2 Tbsp. soy sauce
  • 1 Tbsp. sesame oil
  • Dry roasted sunflower seeds for garnish, optional
Wash and drain Bok Choy and green onions. Chop off about 2 inches of the end of the Bok Choy and discard. Then dice and chop the leafy part and the white celery like stalks into bite size pieces. Next chop off root end of green onions and about 2 inches off of the green end and discard, then chop remainder of the onion thin. Toss Bok Choy and onion into a large bowl.  

In 2 cup size measuring cup add in order: olive oil, cider vinegar, soy sauce, and sesame oil, then blend well with a small wire whisk. After it is mixed well add Splenda and mix well again until well blended. 

This will give you about 1 cup of dressing for you to toss over greens. Serve immediately with sunflower seeds on top for garnish. You may prepare greens and dressing in advance and toss just before serving. Enjoy!

You may want to double or triple this recipe because this is one that people will want to eat seconds on. Another great thing about this is that if you manage to have leftovers it will keep for a few days for you to munch on and it will stay crispy.

Tuesday, January 1, 2013

Toaster Hash Browns

May I safely say that this is an amazing bargain. I used to buy packages of 4 toaster hash browns from Ore-Ida at $5 a box, but I recently found that Aldi, a chain of deep-discount groceries, sells a box of 20 hash browns for only $3.29. Well I was timid about going there at first, as it sounded too good to be true, but my son urged me to check it out and I was sure glad that I did. Our store in Frederick, Md is small but very clean, with great prices too. You need to put a quarter into the shopping cart to unlock it, and it will hold onto your quarter until you return it. See how they save money, no carts running loose in the parking lot and no employees needed to round them up. They accept cash, debit cards and recently started accepting credit cards. Oh, and if you don't bring your own bags you will need to purchase them for 6 cents each. I love how they encourage you to recycle, and pass on the savings. So we found out that you can toast these babies in a toaster (and no need to buy the special Ore-Ida hash browns at higher prices). No hot grease to heat up and stink up your house and it's lower in fat too. I'll tell you it's a lower fat, fast and frugal hash brown. A win win situation, enjoy!

Toaster Hash Browns


Plug in your toaster and set at the medium setting. Drop in the frozen hash brown and toast it three separate times, turning between toasting. Be careful not to get burned or shocked here, you use toaster tongs if you have them. Safety calls for unplugging toaster while digging in there to flip the hash brown and avoid a shock. My Stud Muffin says I have leather fingers and can pick up hot items, but I think he's a sissy when it comes to hot food. Serve immediately after toasting. Keep in mind all toasters vary a lot so find the right heat setting and amount of time that will work best for your "Toaster Hash Brown." Fast and frugal always wins for me.